
Software Setup
Initial Installation
Downloading and installing the program is described in detail in the Getting Started section of this manual, at Downloading the Software and Installing the Software. The purpose of this section of the manual is to document advanced methods for setting up the program for multiple independent configurations. Users of basic single-user installations who use only one callsign and who do not need more than one configuration will not need to use the methods described in this section, and should consult the Getting Started section instead.
There should never be more than one copy of the program installed in a single operating system. The program and its installer use Windows Registry entries that only allow for one copy of the program. There are mechanisms to support multiple call signs, multiple hardware configurations, and even multiple Windows user accounts from a single program installation. See the sections below for information on these.
Comments on the Transition from N1MM Logger Classic
The file structure is changed in N1MM+ as compared with N1MM Logger Classic. The program itself is now installed under C:\Program Files in 32-bit Windows systems, or C:\Program Files (x86) in 64-bit Windows systems, but none of the files it writes to are stored there. All user files (databases, ini files, error logs, mc files, wav files, ADIF files, Cabrillo files, UDC files, call history files, etc.) are stored in dedicated subfolders in a Logger+ user files area, which by default is installed inside your personal Documents folder. The installer offers the capability to change either of these locations, but it is recommended that you do not do so; just accept the defaults (exception: if your Documents folder is automatically backed up using OneDrive or a similar system, you may need to install the user files area somewhere outside the reach of that backup system in order to avoid corruption of database files).
Digital engine files (MMTTY, 2Tone, Fldigi) have not been rewritten, and still need to be stored outside the C:\Program Files and C:\Program Files (x86) paths in Windows Vista, 7, 8, 10 and 11, just as they did with Logger Classic. One solution is to leave them where they were with Logger Classic (e.g. under C:\Hamradio\MMTTY or C:\MMTTY or …); a second solution is to create a new folder inside your N1MM Logger+ user files folder for digital engines. Either way works.
Your existing message files from N1MM Logger Classic will work. A partial exception is SSB message files, where the default location for wav files has changed; you can either keep the old mc files and bury your wav files one level deeper in the wav folder (i.e. create a wav subfolder within the wav folder that was created during the install, and put any operator-specific folders within that second-level wav folder), or you can remove the leading wav\ from filenames in the old mc file. Either way works.
Call history files and UDC (User Defined Contest) files should also transfer over without a problem. However, the Logger’s ini file(s) will not transfer (you will have to redo your hardware configuration), and we recommend that you go with the Telnet cluster list supplied with N1MM+. It has recently been augmented and revalidated.
Multiple Call Signs
If you use the Logger with more than one call sign, you should set up a separate database for each call sign. This includes call signs that have a modifier prefix or suffix (like W1ABC/3, or ZL/G4ABC), as well as club call signs, call signs of guest operators who use their own call sign during a contest, or the call sign of a multi-operator station where your computer is used. In each database, make sure that the call sign in the Call box in the Station Information dialog window (from the Config > Change your Station Data… menu item) is the actual call sign used when that database is open. The call sign from this dialog window is what is sent using the {MYCALL} and * macros, and it is also the sent call sign that appears in every QSO: line in the Cabrillo file. For log-checking purposes, this needs to be the call sign that was sent over the air, not the operator’s call sign (to change the operator’s call sign in the log, use the OPON command or Ctrl+O ; to change it in the Cabrillo file, change the contents of the Operators box in the Contest Setup window for that contest).
If you use more than one database with the same call sign, you should take note that when you create a new database (from the File > New Database… menu item), the station information is carried over from the database that was open at the time you created the new database. Therefore if you want to create multiple databases with one of your alternate call signs, you could first switch to an existing database that uses that call sign before creating the new database, in order to avoid having to re-enter the station information in the new database.
If the only thing that changes between databases is the call sign and related information in the Station Information dialog, using separate databases is all you need to do. If you also change hardware configurations for different call signs, you might want to use the Multiple ini Files capability described in the next section.
There are as many as three different ways call signs are used: as station identification on the air, as identification of the operator, and to identify the station owner. The first two of these are used by N1MM Logger+ and appear in different places in the Cabrillo file. The third one normally does not appear in Cabrillo files, although there is a way to add it to the OPERATORS: line in the header. All three can appear in ADIF files, but the Logger only exports the first two to ADIF.
The most important one is the station call sign, i.e. the call sign that the station identifies with over the air. This is the STATION_CALLSIGN field in ADIF. It is the call sign that appears as the sent call sign in every QSO: line in the Cabrillo file, as well as in the CALLSIGN: line in the Cabrillo header. In N1MM Logger+, this is the call sign that is entered in the top (Call) box in the Station Information dialog (Config > Change Your Station Data…). It is the call sign that is sent when you use the {MYCALL} or * macro in function key messages. It is only stored in one place in a database, because it is supposed to be the same for every QSO in that database. It does not change between contests in a database.
If you use more than one station call sign (e.g. your own and a club or secondary call sign), you should use separate databases, one for each station call sign that is used on the air as station identification. You can create new databases using the File > New Database… menu item, and set up the station call sign and other station-related data in the Station Information dialog at the time you create each database.
Note, by the way, that the file name of the database is immaterial. The file name is only the name that Windows uses to find the file. It has no effect on the contents of the file, nor on the Cabrillo and ADIF files that you export. The file name does not have to be a call sign. You can use a call sign as the file name if you want, in order to make it easy for you to remember what the database is used for, but that is entirely optional.
The OPERATOR field in ADIF files is the call sign of the operator who operated the station during that QSO. It is most often used in multi-ops, but it can also be used when a single op uses a club call sign or secondary call sign. In N1MM Logger+ it is stored separately with every QSO in the database, to allow for changing operators in multi-ops. It can be changed using the OPON command, Ctrl+O, or the Config > Change Operator Callsign Stored in Log menu item.
If you never change the operator call sign in the Logger, it will be the same as the station call sign, and you don’t need to think about it. However, if you ever use one of these methods to change the operator’s call sign, it will be remembered from then on for subsequent QSOs, even from one contest to the next. If you use a station call sign at a multi-op and have the operators enter their individual operator call signs whenever the operator changes, then for the next contest using that same database the Operator field in all your QSOs will still be the call sign of the last person who operated during the multi-op, unless you change it at the end of the multi-op or at the beginning of the new contest.
The operator field in the log is not output to Cabrillo, except perhaps in the OPERATORS: line in the header. After a contest, if you want to you can use the Update Ops from Log button in the Contest Setup dialog to collect all of the operator call signs that are stored with QSOs in that log and place them in the Operators box, or you can just type them into the box by hand.
The third call sign that appears in some ADIF files is the station owner’s call sign (OWNER_CALLSIGN). This is only rarely used, either by a guest operator at another station using their own callsign as the station callsign and wanting to identify the host station, or from a club station, or in situations where a club call sign is used as the station call sign and the operation takes place at one of the members’ stations. N1MM Logger+ does not export this field to ADIF, but some general-purpose logging programs do. The owner’s call sign can be added to a Cabrillo file in the OPERATORS: line in the header by placing the @ character in front of the owner’s call sign as one of the operators.
For example, if VE3KI were to operate using the VA3RAC club call sign from VE3FU’s home station, he would use a database with VA3RAC as the station call sign. Before the contest he would use Ctrl+O to enter VE3KI as the operator’s call sign. He would enter VE3KI @VE3FU in the Operators field in the contest setup dialog in order to output that information to the OPERATORS: line in the Cabrillo file. The Cabrillo header would contain the line CALLSIGN: VA3RAC, and every QSO: line in the Cabrillo file would have VA3RAC as the sent call sign. The ADIF file exported by the Logger would contain the fields <STATION_CALLSIGN:6>VA3RAC and <OPERATOR:5>VE3KI in every QSO record, but the owner’s call sign (VE3FU) would not appear in the exported ADIF file.
Multiple INI Files
Previous users of N1MM Logger Classic may be familiar with a capability to start the program with alternative .ini files, for example for different configurations for different radios, different modes, etc. A similar capability exists in Logger+. You can use alternative .ini files for different screen layouts and skins, different hardware, or even as an alternative method for calling up different databases in place of using the File > Open database… menu item.
The following instructions assume you did a standard install, with the program files stored in C:\Program Files (x86)\N1MM Logger+\, and the modifiable (user) files in Documents\N1MM Logger+\. Step-by-step instructions follow for making two new shortcuts called Radio1 and Radio2 (you can, of course, call them something else), using new ini files called Radio1.ini and Radio2.ini . If you want only one new shortcut, or three, the process is the same with the obvious changes to accommodate the number you want.
First, in File Explorer navigate to your C:\Program Files (x86)\ folder. If yours is a 32-bit system, and there is no C:\Program Files (x86)\ folder, then go to C:\Program Files\ instead. Either way, inside that folder find the N1MM Logger+ subfolder and open it. Find the file called N1MM Logger.net.exe, right-click on it and select “Create shortcut” from the pop-up menu. In Windows versions after XP, a small window will open up that says “Windows can’t create a shortcut here. Do you want the shortcut to be placed on the desktop instead?”. Click on Yes – the desktop is where you want the shortcut anyway. That will create a new shortcut on your desktop called N1MMLogger.net.exe – Shortcut. Right-click on this shortcut and select “Rename” from the pop-up menu. Change the name to Radio1 (or whatever you want to call this shortcut).
For a second desktop shortcut, repeat the entire process in the previous paragraph, except when you rename the second new shortcut, call it Radio2 (or whatever you want to call it, as long as it’s not the same as the first one or any other shortcut on your desktop).
Next, in File Explorer navigate to your Documents\N1MM Logger+\ folder where your user files are kept (Note: if there is more than one N1MM Logger+ folder in your system or if the user files area has been moved at any time, the one you want is the one pointed to by the Help > Open Explorer on User Files Directory menu item). Find the file called N1MM Logger.ini, right-click on it and select “Copy” from the pop-up menu. Right-click somewhere else in the File Explorer window (the part where all the files and folders are displayed) and select “Paste” from the pop-up menu. This should create a new file called N1MM Logger – Copy.ini (or possibly N1MM Logger – Copy (1).ini if there is already another file with the first name). Right-click on this file and select “Rename” from the pop-up menu. Change the name to Radio1.ini (or whatever you want to call it).
Again, for a second shortcut you would repeat the entire process in the previous paragraph, and name the second new file Radio2.ini (or whatever you want to call it).
Now, back on the desktop, right-click on the Radio1 shortcut and select “Properties” from the pop-up menu. A dialog window should open with the shortcut properties pane visible, and the name of the program in the Target: box highlighted in blue. It should look something like this:
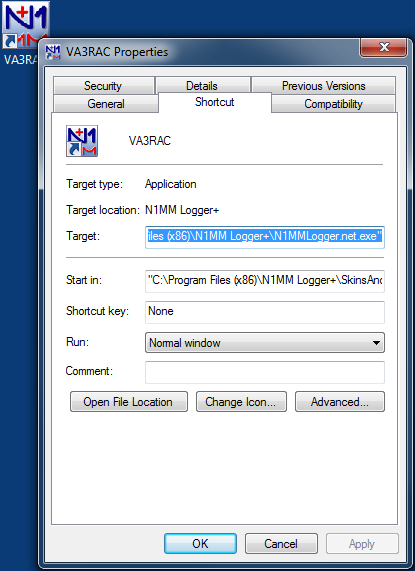
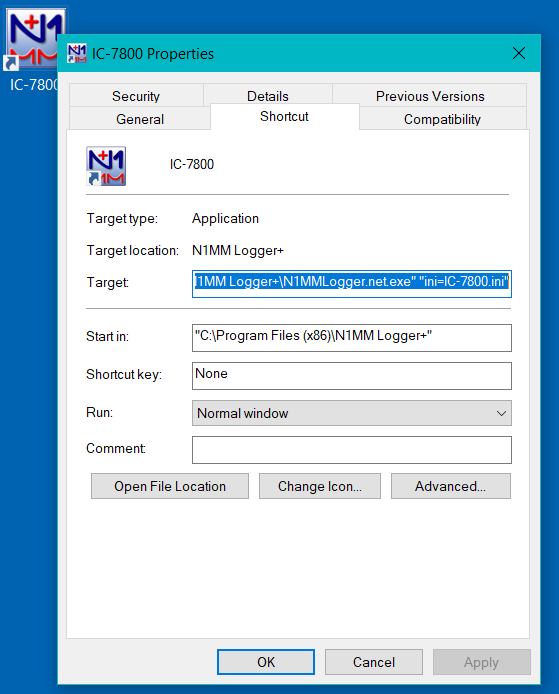
In that Target box, move the mouse cursor just to the right of the rightmost “, but still inside the text box, and left-click. That should turn the blue highlighting off and leave the mouse cursor just to the right of the ” (you can use the right arrow key to move the cursor there if you didn’t quite get it where you want it). Type a single space, then Ini=Radio1.ini . If the name you chose for the ini file had a space in it, then surround either the file name alone or the whole argument in quotation marks, e.g. Ini=”Radio 1.ini” or “Ini=Radio 1.ini”. Do not leave any spaces immediately before or after the = sign. Click on OK. The screen shot below shows an example where the desktop shortcut is called IC-7800 and the ini file is called IC-7800.ini .
Once more, for a second shortcut you would repeat the process in the previous paragraph with the Radio2 shortcut except now the argument should read Ini=Radio2.ini (or whatever you called it).
When you start the program using the Radio1 shortcut the first time, the configuration will be the same as it was before, but now you can make changes (different radio, different COM ports, etc.) that will only apply to the Radio1 shortcut. Ditto for Radio2. Note that although the configurations can be different, both configurations can still point to the same database or to different databases – that’s your choice. You can change databases from the File > Open Database… menu item, but that only changes the remembered database for the current desktop shortcut and ini file, not for the other one(s). If both configurations point to the same database, then any new contests or new QSOs you add to the database from one desktop shortcut will also be there with the other one, since they are using the same database. When you first start the program from a shortcut, the contest log that was last used from that shortcut will be the one that is opened, regardless of whether or not other contest logs in the same database had been created and/or opened from another shortcut.
Multiple Users on a Single Computer
N1MM Logger+ stores the station call sign and some related data in the same database file where the QSOs are stored. If you are happy with an overall configuration but want to use multiple station call signs (e.g. a club callsign or a special event callsign instead of your own), you can simply create a different database for each call sign, and you can probably skip the rest of this section.
On the other hand, if you want completely different user file environments for different setups, you might want to set up separate user file areas for each configuration. Or, if you install N1MM Logger+ on a computer that is used by different users and you want a means to protect each user’s files from the other users, you may want to learn how to set up N1MM Logger+ for multiple different configurations on the same computer under different user accounts.
First, you need to decide whether you will restrict the changes from one configuration to another to those that are controlled from the N1MM Logger.ini file (in a nutshell, hardware configuration items that are set up in the Configurer, window layouts, and the initial choice of which database and contest log the program starts up in), or whether you want more extensive differences between configurations. For most users, the former capability, which existed in N1MM Logger Classic, will be enough. This capability is described in the previous section, on Multiple ini files.
In the most complex setups, you may wish to set the program up for different users who will be using different Windows user accounts, or for different user file environments for different program and hardware configurations. If only one Windows user account is used, either by multiple users or by a single user using different program configurations, you can create multiple N1MM Logger+ user files folders within the same parent folder. If multiple Windows user accounts are involved, each user can have their own independent Logger+ user files area stored either in their own personal Documents folder or in some other place that their user account has access to. In this scenario, each Logger+ user file area will only be accessible to that particular user. In either case, any changes that are made in one Logger+ user file area will not be reflected in other user file areas. This includes everything from hardware configuration changes to logging of individual QSOs. If you want to use multiple Windows user accounts but allow all users to share a single Logger+ user file area, for example in order to log QSOs to a single shared contest log, there is also a way to do this using the UserDir= command-line argument described below to make each of the users’ desktop shortcuts point to the same shared user file area. Note that if there is more than one user files area in your system, the one the program is currently using will always be the one that is pointed to by the Help > Open Explorer on User Files Directory menu item.
Regardless of how many user accounts you may run the program from, the program itself is only installed once. The installation is a normal one. The program installation, both for the initial install and for subsequent updates, should be done from a user account that has administrative privileges on that computer.
The program files will be installed to the program files area (normally C:\Program Files\N1MM Logger+ on a 32-bit system, or C:\Program Files(x86)\N1MM Logger+ on a 64-bit system). The Logger’s user file area will usually be the file area you want to use with the first or main configuration, and by default this is normally located in your Documents folder. In Windows 7 or 8 this would be C:\Users\[username]\Documents\N1MM Logger+ where [username] is the user name you log into Windows with. In Windows XP SP3, the corresponding location would be C:\Documents and Settings\[username]\My Documents\N1MM Logger+. In computers where OneDrive is, has been or is likely to be active, the original installation of the user files area might have been to a different location, such as C:\HamRadio\N1MM Logger+.
Now, for the second configuration, create a new folder in a location that the user of the second configuration will have access to. If that user is you, you might simply create another folder in your Documents folder and give it a name that reflects the new configuration. If that user is someone else who is using a different user account to log in to Windows on your computer, it might be a new folder in that user’s personal Documents folder, either called N1MM Logger+ (so it will be called up from the default desktop or Start Menu icon) or named otherwise for use with a customized desktop icon.
Now you need a way to tell N1MM Logger+ which user file area to use. The original N1MM Logger+ desktop icon created during program installation will start the program using the configuration and database files in the original user files area when the program is run from the account that was used to install the Logger, or from the assumed default location in the local Documents folder when it is run from a different account. If you want to use a customized file area, you need a way to tell the program to use the new user files area you just created instead of the default.
While logged into the Windows account from which the program will be used, use Windows File Explorer to find the N1MMLogger.net.exe file in the N1MM Logger+ program folder, right-click on the file in Windows Explorer and select “Copy”, then right-click on an empty area of the desktop and select “Paste Shortcut”. This should create a new shortcut on that user’s desktop.
Rename the new shortcut to differentiate it from the original short cut. To do this, right-click on the new shortcut, select Rename, and type the new name reflecting the new configuration you will use it with into the space just below the icon.
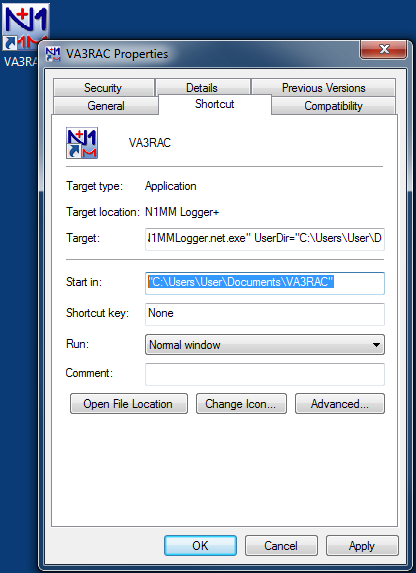
Now right-click on the icon once more, and select Properties from the pop-up menu. You should see a dialog that looks something like this:
Mouse-click to the right of the highlighted program name in the Target text box, type one space, then the keyword UserDir= and the full pathname to the new folder between quotation marks, e.g. either UserDir=”C:\Users\[username]\Documents\[new folder name]” or “UserDir=C:\Users\[username]\Documents\[new folder name]” (Windows 7 or 8 – in Windows XP SP3, this would be “UserDir=C:\Documents and Settings\[username]\My Documents\[new folder name]”). There must be no spaces between the UserDir and the =, or between the = and the folder name. In the screen shot below, I have copied that same pathname (without the UserDir= keyword) into the “Start in” text box; the Target text box is not wide enough to show its entire contents:
Click on OK to exit the Properties dialog. The new shortcut will now start the program up using the user files from the new folder instead of from the original N1MM Logger+ user files area. The first time it is run, if the new user files area is empty the program will create a new set of user files from scratch, just as it did in the original installation. Open the program from the new shortcut, enter any changes in call sign and related data into the Station Information dialog (Config > Change Your Station Data), use the File > New Database menu item to create a new database in the new Databases folder to hold contest logs using the new configuration, and proceed to the Configurer to do the hardware setup. You can copy other user files (function key message files, call history files, etc.) from the original user file area to the corresponding places in the new user file area to save time in setting them up.
From this point on, you can use the original N1MM Logger+ desktop icon to call up the program using the first configuration, and the new desktop icon to call up the program using the second configuration. In effect, you now have two virtual copies of the program. You can run either virtual copy, but only one at a time – you can’t have two copies running simultaneously in the same computer.
You can configure each of these virtual program copies independently; any new contest logs you create in one copy will not be visible to the other copy, and any changes you make to the configuration, databases, window locations and layout, skins, and so on in one copy will not have any effect on the other copy. Because of this, if you add new hardware that requires you to make changes in the Configurer, you will have to make those changes in both places. If you want to share user data, such as function key messages or call history files, you can make changes in one place and copy the changed files into the corresponding location(s) in the other user file area.
